This is the perfect project for a weekend. I did the white stain wiping on Saturday and the poly coat on Sunday and the whole project took me less than two hours of total work.
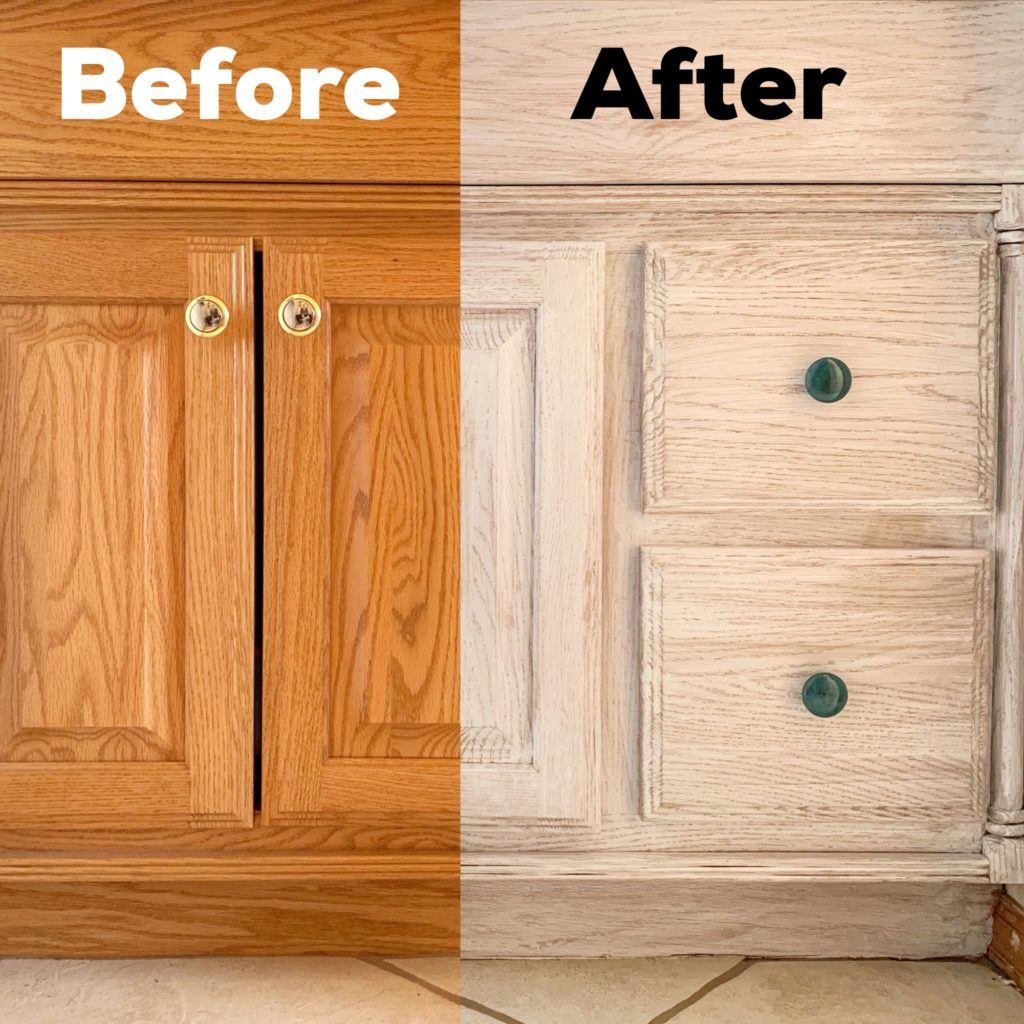
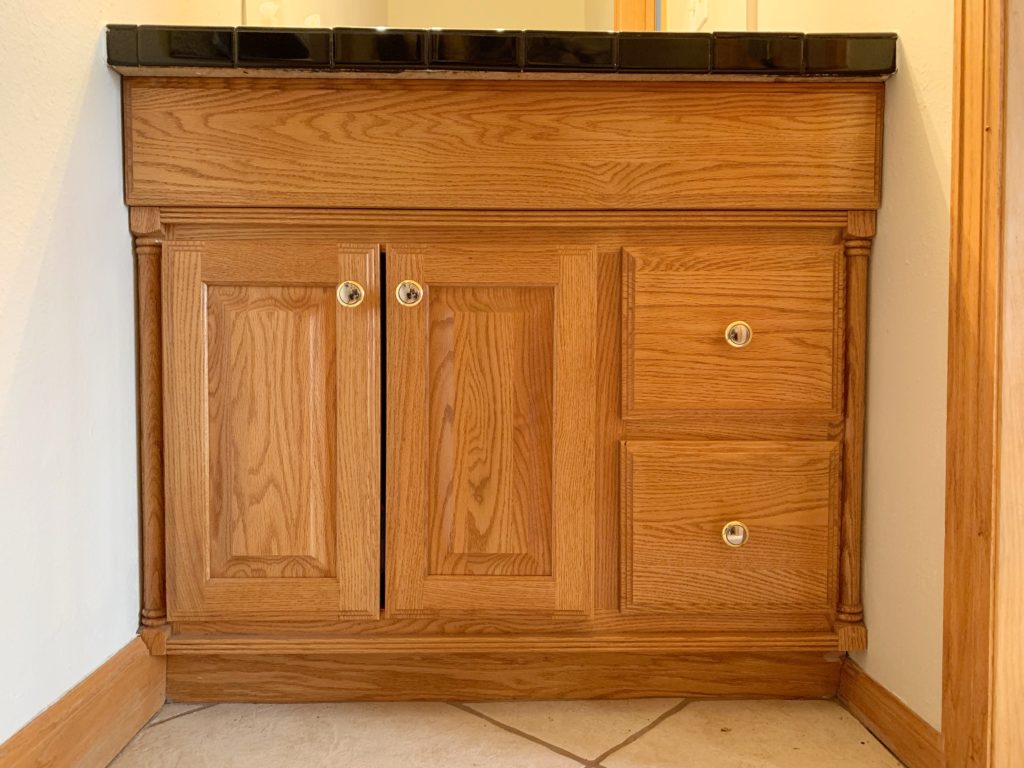
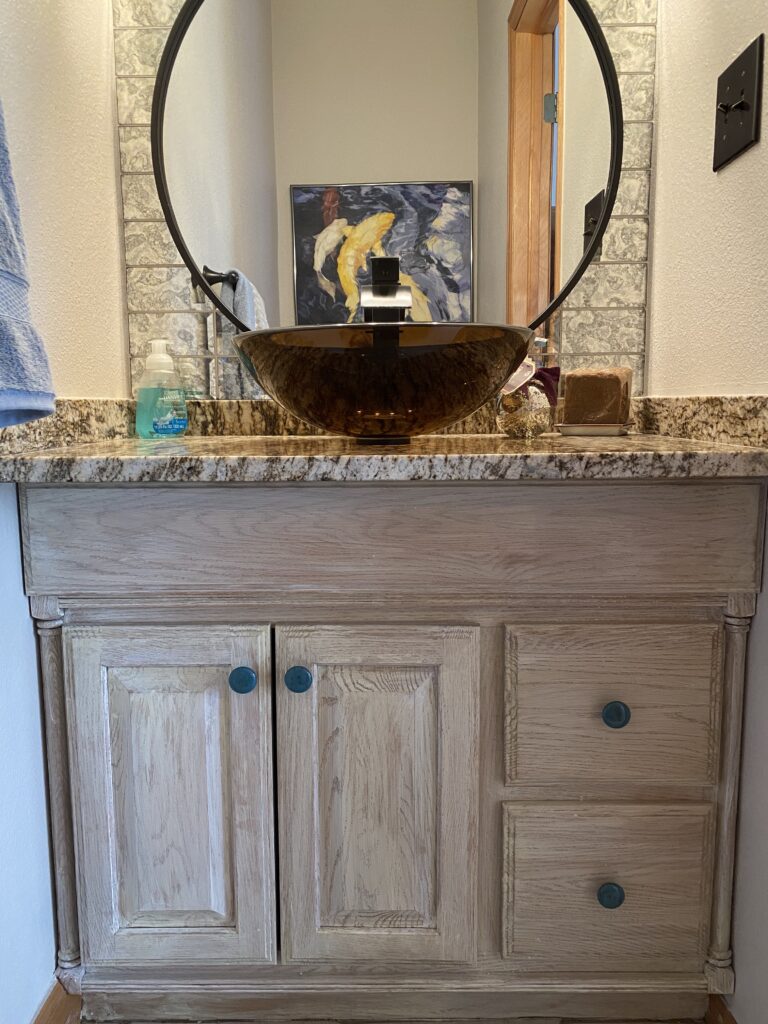
Our guest bathroom is fine-ish. It’s functional, dated, and generic. Like so many generic bathrooms across America, it contains the standard contractor-grade “built-in” yellow oak vanity. I realized, though, that ripping it out would require major drywall work, and by extension, a redo of the entire bathroom – no.
Check out the web story of this process here!
Considering the major work that needs to be done across our entire house, a full remodel of just the small guest powder room is low on the priority list. That doesn’t mean that there’s no room for a small upgrade with a big impact – until we win the lottery.
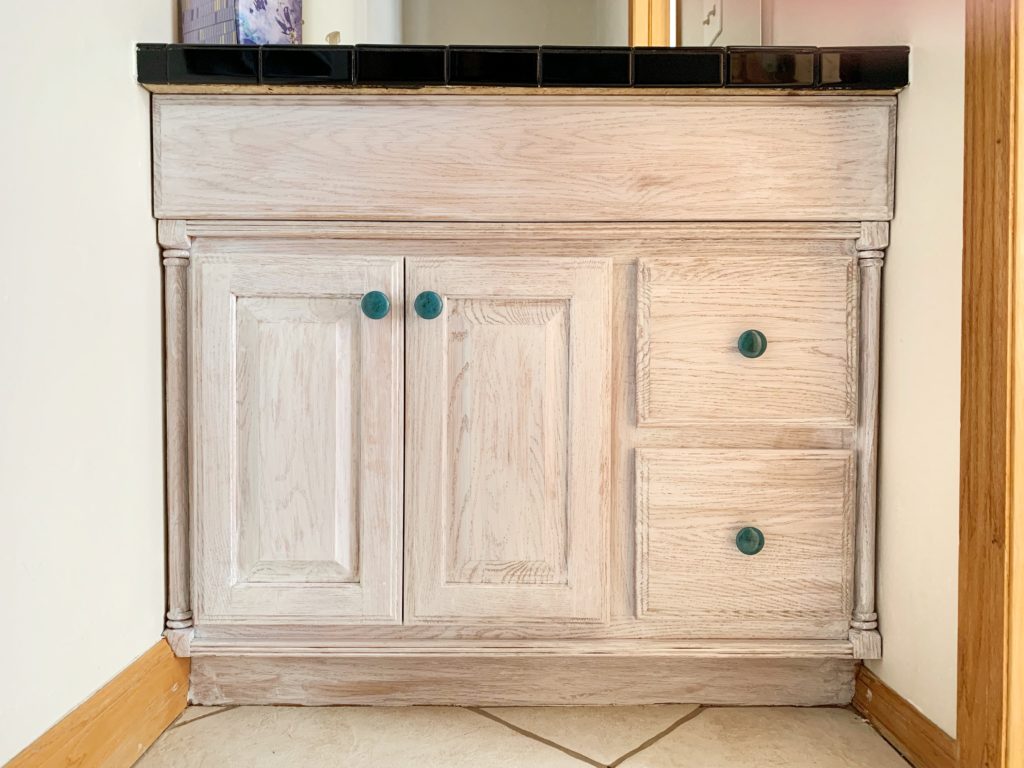
Rather than just painting this vanity, I wanted a distressed farmhouse “shabby chic” look. I went with a glaze because I like the grain of the wood to show through. Also, I am super lazy and I was NOT interested in the multi-step process of stripping/sanding/filling that is required to paint an entire piece. Luckily, I achieved exactly the look I was going for with this method. Using a wiping glaze gave it the right consistency, the best color, and the least work.
What you need:
Wiping glaze – I spent a LOT of time looking for the perfect thing for me – this is what I used. It’s the “pickling white” color. I was skeptical of getting paint via Amazon, but it was delivered totally fine.
Polyurethane top coat – you can find this anywhere
A no-pilling rag to wipe stain with – I used an old
A paintbrush – for the topcoat
A really good cleaner – this is prep step you do not want to skip. There’s probably years of who knows what on these vanities. I rubbed every surface down with denatured alcohol. Based on what came off the wood, it was much grosser than I had thought.
Painter’s tape and plastic – even if you’re extra meticulous, you will drip.
Plastic gloves – you’re wiping this stain on with a cloth. White nails are trendy, but not that trendy.
New knobs – my husband went with me to Hobby Lobby to pick out ours, I kid you not. He picked the turquoise – this was both a surprise and impressive. $12 total.
Optional: A piece of large-grain sandpaper – if you decide to rough up the wood to make the glaze adhere better. I chose not to and it was fine. I picked specifically this wiping stain because it looked like it would stick to anything, and it did. Again, I’m lazy.
What to do:
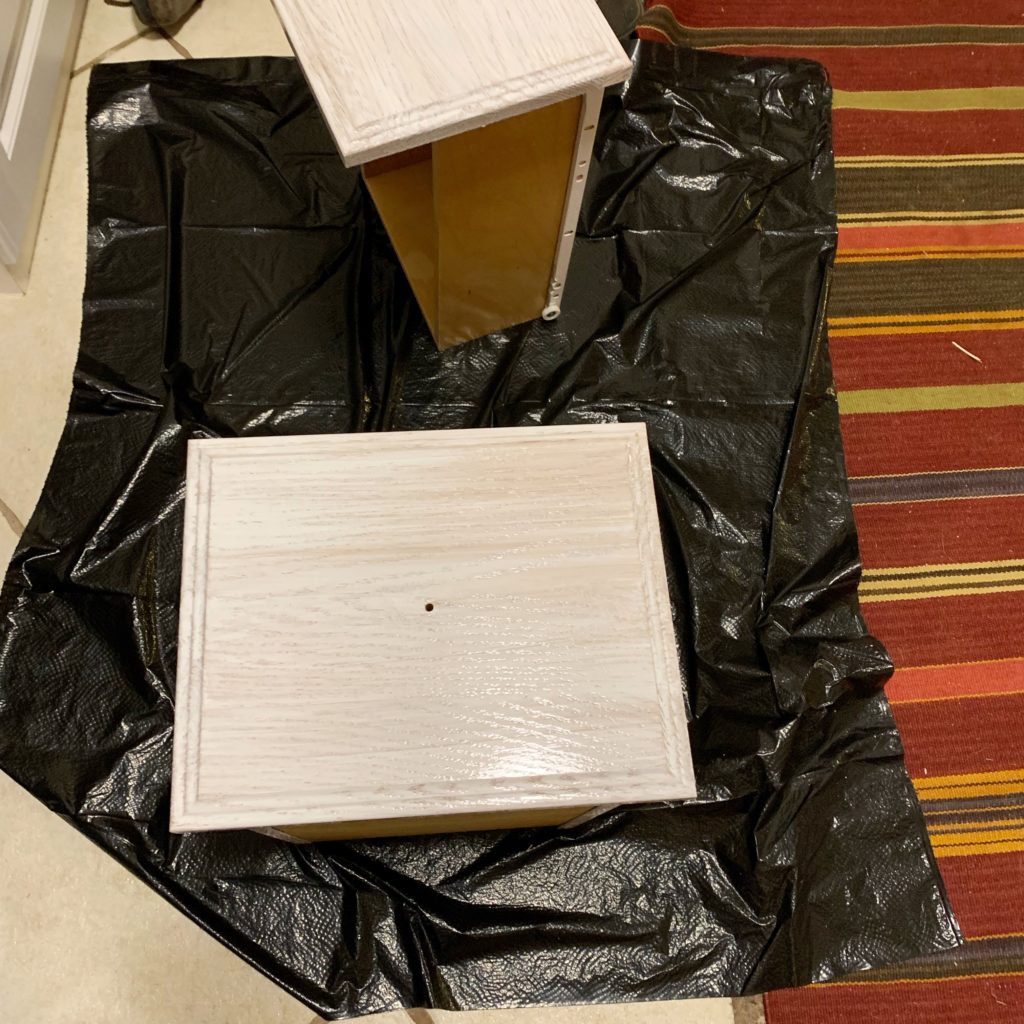
Remove all doors and drawers. Lay then out on plastic. Thoroughly clean all surfaces with
Tape and cover all surfaces you don’t want white splotches on.
Optional: Rough up wood with large-grain sand paper. Then clean again, (pass).
Wipe stain over all surfaces to color. Wipe with the grain of the wood. You can wipe on and wipe off several times to achieve the desired look.
Do a second coat of stain if you so choose after a few hours. This allows you to get a more uniform look over the whole piece and touch up where you need.
Let dry overnight.
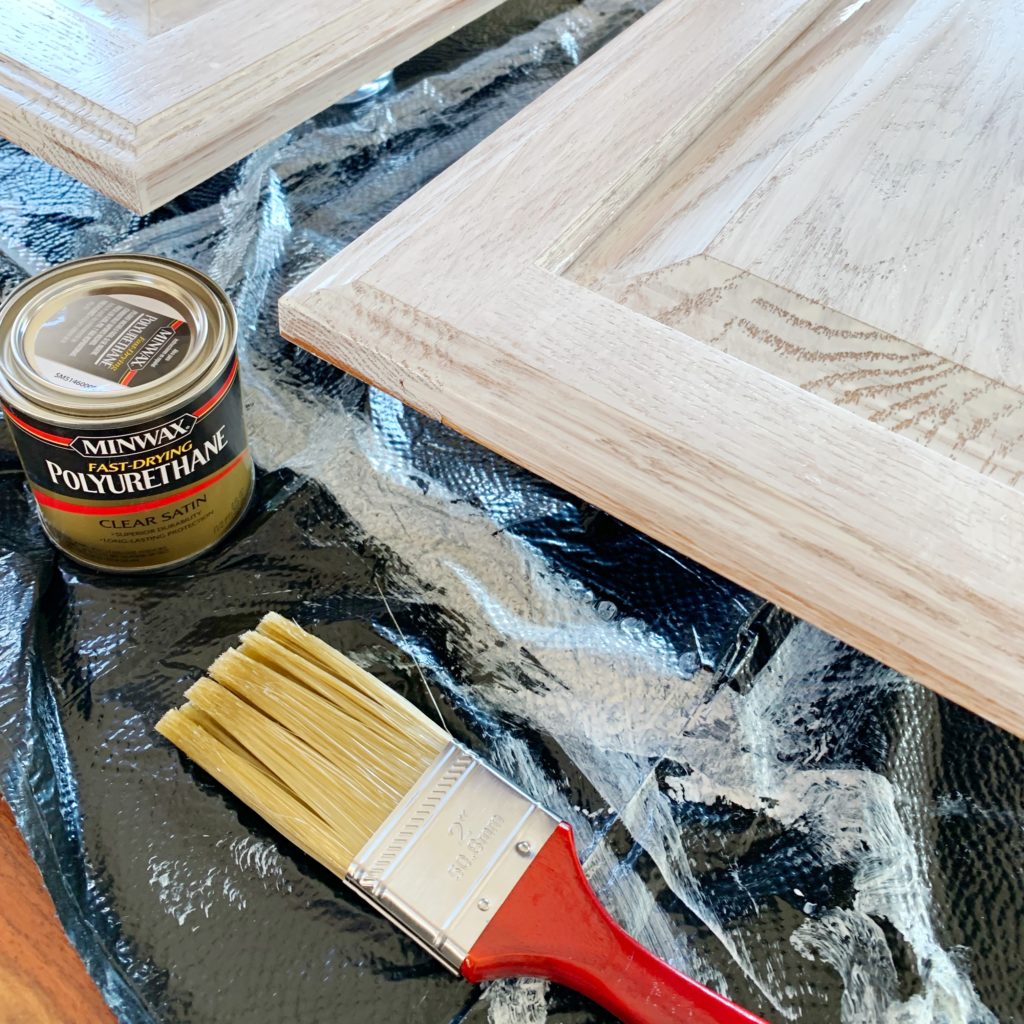
Paint one to two coats of polyurethane on every stained surface. Let dry completely.
Replace doors, drawers, knobs.
Take photos for Insta. OBVIOUSLY – if you don’t photo it, it didn’t happen.

Hard lessons:
Do not skimp on taping or covering of other surfaces. I found that I’d gotten a few splotches on the trim surrounding the vanity. Luckily we like the look enough that staining the trim in that bathroom is next on the list.
Wear gloves. It takes a long time for this stuff to come out from under your fingernails. I may or may not still trying to get it off.
Clean well before you stain. This stain is a great consistency and adheres well, but years of wear – even if it doesn’t look dirty – leaves a film on wood that will make the stain not stick.
Update:
So, it’s now been over a year with this treatment on the cabinets. I still LOVE it. It looks just like it did the day I did it. In fact, I love it so much that I had a granite guy come out and replace what was a tile counter for a legit granite one and even added a snazzy vessel sink. Now our guest bath looks AWESOME. Also, if you enjoyed this post I just did some bedside tables/nightstands (I don’t know what the difference is between these two things) that you should check out.
It wasn’t that long ago that the “before” was the “after”…especially in Arizona.
All trends seem to be cyclical.
Can you whitewash over the fake boards they use for the side of these cabinets?
So, mine aren’t fake. My whole vanity is wood – I DOUBT it would work well with laminate because there’s nothing for the stain to adhere to.
I cannot get the same product that is oil based shipped to my home as you did! Can you use white wash pickling water based stain?
I think you can go for any layering stain.
Why kind of wiping glaze you used in this project? The link is dead… Thx!
Hi Karen! The link works for me, but I used the “Old Masters” wiping stain with this one, but any layering stain should work. Good luck! Lemme know how it goes.
How does this treatment stand up over time?
I tried this and it didn’t work at all!! I specifically wanted something I could use without sanding off the existing finish but the stain just beaded up on the surface and when I wiped it away it all came off and left the cabinets exactly as they were before. Did you cabinets not have polyurethane or any kind of deal on it? I guess o assumed that it did since you said you didn’t have to remove the existing finish but maybe you just meant the stain that was on it??
Hi Alicia!
I didn’t sand or strip at all. That’s the advantage of this stain specifically. The only things I can think of are 1) Are you sure you’re using real wood and not laminate? This won’t work on laminate. or 2) Maybe your vanity has some non-contractor-grade sealant or veneer on it? This was just a standard contractor grade old wood vanity.
Sorry it didn’t work for you!
Kelly
What color did you use?
OLD MASTERS 12404 WIP Stain, Pickling White
My bathroom cabinets have wood doors, but everything else is some kind of faux wood/laminate. They are the same color as in your before photo. Were yours the same? Can I use the stain on those faux wood sections, too?
Hi Jackie – The wood doors will work, my whole vanity is wood so I don’t know about the laminate part. I doubt it would adhere well to laminate. Maybe try a paint on the laminate and the stain on the doors? I bet that would look super cool.
For laminate use a glue that will make it stick. Works on formica also https://www.faceliftfurniture.com/refinishing-formica-laminate-furniture/
So did you not have to completely strip the wood from the previous poly coat before covering it up?
I didn’t. I *DID* use denatured alcohol to really get down past all the grime, though. And this was an old piece with a very thin coating. Like 90s contractor grade.
Is this the ‘pickling white’ shade? Absolutely LOVE the way this turned out!
Could I do this same process on out dated kitchen cabinets?
I just wanted to confirm that you went from orange oak cabinets and applied the pickling white stain and this is the result? I love it and want to get it also. I have the same oak cabinets and already cleaned and light sanded.
Thank you for your help!
So excited for you!
And yes, pickling white.
Ok so I have the Old Maters Pickling white up for purchase and then they threw me a curve ball! Is it wiping stain or fast drying wood stain or gel stain or penetrating stain? Ha! 😳
Wiping stain. I let it dry overnight before I added any poly.
I was astonished when I saw the before and after photos of this vanity. It’s absolutely gorgeous! Definitely worth every minute you spent on the restoration process. Thank you for sharing your product information with us.
Thanks Elaina!
Did you have to sand at all on the original cabinets? I want to try this on my kitchen cabinets
Just curious which “denatured alcohol “ you used? The one I got says it’s alcohol appliance and marine stove fuel and not to rub it, because it could create sparks. It says it’s very flammable.
Hi Terri!
I used the kind they have at Home Depot or any hardware store. Not sure if it’s the same at a marine store, that sounds like it might be more powerful. I just poured it on a dust rag and wiped it down (make sure you dispose of rags safely to prevent fires).
You did not sand this wood? Is that what I’m understanding you to say?
Correct, I did not. Now, it’s a bit older, so it didn’t have a lot of that sheen of a newer cabinet, but this glaze adhered perfectly and has aged well.
Great update, looks really good!
Thanks, Linda! I love it.
Hi! I really liked the look you achieved – thanks for posting!
I do have a question – when you say you wiped the stain on the wood, did you apply it with a brush and then wiped it off with a cloth ? Just making sure I’m doing it the right way. I already bought the materials and am excited about starting the project! Thanks!
Hi! I LOVE your project. I wondered your opinion on something, we have one half of our kitchen that is newer stained oak that I’d love to do this treatment to. However the other half of our kitchen is getting new unfinished oak. Would the treatment look the same if they’re plain underneath? I’m thinking it would be hard to match?
Ohhhh, I doubt it because it’s contingent on the base color. Post pics I’d love to see what you do!
Wow, this turned out awesome! I had a cabinet refinisher update my kitchen cabinets a few months ago, and ever since then, I’ve had the itch to change up the vanity in my master bathroom. I love the distressed look, and after seeing your post, it gave me some encouragement that I could tackle this project myself!